---
url: 'https://laros.io/adding-a-custom-font-to-the-vitepress-default-theme.md'
description: >-
Learn how to customize VitePress's Default Theme by replacing the default font
with a custom font, and optimizing performance with font preloading.
---
# Adding a custom font to the VitePress Default Theme
By default, VitePress's Default Theme includes the **Inter** font in the final build and preloads it in production. If you'd like to use a different font with VitePress’s default theme, here’s how you can do it. We’ll use **Mona Sans**, a font from GitHub, as an example, but you can follow these steps with any other font you'd like to use.
## Remove the default font (Inter)
First, let’s stop VitePress’s default theme from including **Inter** in the build. You can do this by switching to a version of the theme that doesn't load fonts by default.
Open your theme file (`.vitepress/theme/index.js`) and update it like this:
```js
// .vitepress/theme/index.js
// Use VitePress's default theme without loading the default fonts
import DefaultTheme from 'vitepress/theme-without-fonts';
// Load your custom CSS file where you'll set your own fonts
import './custom.css';
export default DefaultTheme;
```
## Download a custom font
For this tutorial, we’ll use **Mona Sans** as an example. You can download it from the official [GitHub repository](https://github.com/github/mona-sans). After downloading the font files, place them in your project’s `/src/public/fonts` folder.
## Add the font to your custom CSS
Next, we need to tell your site to load the **Mona Sans** font (or any other font you’re using). To do this, create or open your custom CSS file at `.vitepress/theme/custom.css` and add the following code:
```css
/* .vitepress/theme/custom.css */
@font-face {
font-family: 'Mona Sans';
src:
url('/fonts/Mona-Sans.woff2') format('woff2 supports variations'),
url('/fonts/Mona-Sans.woff2') format('woff2-variations');
font-weight: 200 900;
font-stretch: 75% 125%;
}
```
## Set the custom font as the default in VitePress's Default Theme
Now, let’s make your custom font the primary font across your site. VitePress uses CSS variables to manage its fonts in the Default Theme, so we’ll override these variables to use the custom font.
In the same CSS file (`.vitepress/theme/custom.css`), add this:
```css
/* .vitepress/theme/custom.css */
:root {
--vp-font-family-base: "Mona Sans", ui-sans-serif, system-ui, sans-serif, "Apple Color Emoji", "Segoe UI Emoji", "Segoe UI Symbol", "Noto Color Emoji";
}
/* (Optional) apply the font to the whole document */
html {
font-family: var(--vp-font-family-base);
}
```
This sets **Mona Sans** as the default font for your site while maintaining the VitePress Default Theme structure. You can easily replace **Mona Sans** with any other font by modifying the `--vp-font-family-base` value.
## Preload the font for better performance
To improve your site's performance, it's a good idea to preload the custom font. This ensures that the font starts loading as soon as the page begins to load, reducing delays when rendering text.
Open your VitePress config file (`.vitepress/config.js`) and add the following:
```js
// .vitepress/config.js
export default {
transformHead({ assets }) {
// Find the Mona Sans font file in the build output
const myFontFile = assets.find(file => /Mona Sans\.\w+\.woff2/);
if (myFontFile) {
return [
[
'link',
{
rel: 'preload',
href: myFontFile,
as: 'font',
type: 'font/woff2',
crossorigin: ''
}
]
];
}
}
};
```
## All set!
That’s it! You’ve now successfully replaced VitePress’s default **Inter** font with a custom font while keeping the Default Theme intact. Whether you’re using **Mona Sans** or another font, the steps remain the same.
## Resources
* [VitePress](https://vitepress.dev/)
* [Mona Sans](https://github.com/github/mona-sans)
---
---
url: 'https://laros.io/generating-an-rss-feed-with-vitepress.md'
description: >-
Learn how to generate an RSS feed with VitePress using build hooks and the
feed npm module. Keep readers updated on new blog posts easily.
---
# Generating an RSS feed with VitePress
RSS feeds are a convenient feature for blog readers, as they allow them to easily stay updated on new posts without having to constantly check your blog, making it more likely that readers will return to your website.
## Build Hooks
Since VitePress introduced [build hooks](https://vitepress.dev/reference/site-config#build-hooks), it's fairly simple to generate RSS feeds. Build hooks allow developers to customize the build process by adding their own logic to be executed at specific points during the build process.
## Dependencies
Before we start, let's make sure to install the `feed` npm module, which enables us to generate RSS feeds.
```bash
npm install feed -D
```
## Configuring VitePress
Here's an example configuration file for VitePress that generates an RSS feed. You can modify or remove any part of the code as per your requirements. The feed is written to an RSS file in the `outDir` directory.
`.vitepress/config.ts`
```ts
import path from 'path'
import { writeFileSync } from 'fs'
import { Feed } from 'feed'
import { defineConfig, createContentLoader, type SiteConfig } from 'vitepress'
const hostname: string = 'https://laros.io'
export default defineConfig({
buildEnd: async (config: SiteConfig) => {
const feed = new Feed({
title: 'Paul Laros',
description: 'My personal blog',
id: hostname,
link: hostname,
language: 'en',
image: 'https://laros.io/images/paul-laros.jpg',
favicon: `${hostname}/favicon.ico`,
copyright:
'Copyright (c) 2023-present, Paul Laros'
})
// You might need to adjust this if your Markdown files
// are located in a subfolder
const posts = await createContentLoader('*.md', {
excerpt: true,
render: true
}).load()
posts.sort(
(a, b) =>
+new Date(b.frontmatter.date as string) -
+new Date(a.frontmatter.date as string)
)
for (const { url, excerpt, frontmatter, html } of posts) {
feed.addItem({
title: frontmatter.title,
id: `${hostname}${url}`,
link: `${hostname}${url}`,
description: excerpt,
content: html,
author: [
{
name: 'Paul Laros',
email: 'hey@laros.io',
link: 'https://laros.io/authors/paul'
}
],
date: frontmatter.date
})
}
writeFileSync(path.join(config.outDir, 'feed.rss'), feed.rss2())
}
})
```
*The code snippet above is heavily inspired by the official [Vue.js blog](https://github.com/vuejs/blog) repository.*
## How to use
The code snippet above requires the `title`, `description` and `date` frontmatter values to be set. Here's an example:
`my-awesome-post.md`
```md
---
title: My awesome post title
description: My awesome post description
date: 2023-04-06
---
# My awesome post title
My awesome post content
```
## Resources
* [VitePress](https://vitepress.dev/)
* [Feed](https://github.com/jpmonette/feed)
---
---
url: 'https://laros.io/adding-dynamic-meta-tags-to-vitepress.md'
description: >-
Learn how to add custom meta tags with page data to VitePress, using the
VitePress transformHead build hook, to improve the SEO of your VitePress-based
website.
---
# Adding dynamic meta tags to VitePress
It is generally recommended to include meta tags on your webpage to ensure that your content can be indexed by search engines and is displayed correctly when shared on social media.
## Build Hooks
VitePress [build hooks](https://vitepress.dev/reference/site-config#build-hooks) enable you to enhance the functionality of your website, such as adding sitemaps, PWA support, and search indexing. The `transformHead` build hook can be used to add page data dynamically to the `` of the page.
## Configuring VitePress
In this example we demonstrate how to set some of the Open Graph meta tags using the `transformHead` build hook. However, it can also be used to set the canonical URL, Twitter meta tags, article tags, and more.
`.vitepress/config.ts`
```ts
import { defineConfig, HeadConfig } from 'vitepress'
export default defineConfig({
transformHead: ({ pageData }) => {
const head: HeadConfig[] = []
head.push(['meta', { property: 'og:title', content: pageData.frontmatter.title }])
head.push(['meta', { property: 'og:description', content: pageData.frontmatter.description }])
return head
}
})
```
## How to use
VitePress allows frontmatter in all Markdown files, which must be at the top of the file. Here is an example of a markdown file, which utilizes frontmatter to set the `title` and `description` metadata:
`my-awesome-page.md`
```md
---
title: My awesome page title
description: My awesome page description
---
# My awesome page title
```
One you have added the example page, run the `vitepress build` command. Here is an example of what the output should look like:
`my-awesome-page.html`
```html
...
...
```
## Resources
* [VitePress](https://vitepress.dev/)
* [Open Graph](https://ogp.me/)
---
---
url: 'https://laros.io/generating-a-dynamic-sitemap-with-vitepress.md'
description: >-
Learn how to generate a dynamic sitemap XML file with VitePress, using the
transformHtml and buildEnd build hooks.
---
# Generating a dynamic sitemap with VitePress
By including a sitemap on your website, you can ensure that all pages are indexed by search engines, which can improve your site's visibility in search results and make it easier for users to navigate.
## Build Hooks
VitePress [build hooks](https://vitepress.dev/reference/site-config#build-hooks) enable you to enhance the functionality of your website, such as adding sitemaps, PWA support, and search indexing. In the examples below we're using the `buildEnd` hook to generate the sitemap XML file.
## Dependencies
Before getting started, make sure to install the `sitemap` npm module. The module allows developers to easily create sitemaps in XML format.
```bash
npm install sitemap -D
```
## Configuring VitePress
Place the following snippet in your VitePress config file, adjust the URL, and run `vitepress build` to compile a sitemap.
`.vitepress/config.ts`
```ts
import { createContentLoader, defineConfig } from 'vitepress'
import { SitemapStream } from 'sitemap'
import { createWriteStream } from 'node:fs'
import { resolve } from 'node:path'
export default defineConfig({
lastUpdated: true,
buildEnd: async ({ outDir }) => {
const sitemap = new SitemapStream({ hostname: 'https://laros.io/' })
const pages = await createContentLoader('*.md').load()
const writeStream = createWriteStream(resolve(outDir, 'sitemap.xml'))
sitemap.pipe(writeStream)
pages.forEach((page) => sitemap.write(
page.url
// Strip `index.html` from URL
.replace(/index.html$/g, '')
// Optional: if Markdown files are located in a subfolder
.replace(/^\/docs/, '')
))
sitemap.end()
await new Promise((r) => writeStream.on('finish', r))
}
})
```
## Clean URLs
If you have [clean URLs](https://vitepress.dev/guide/routing#generating-clean-url) enabled, use the following regex instead. Everything else can remain the same.
```ts
// If `cleanUrls is enabled`
.replace(/index$/g, '')
// If `cleanUrls` is disabled
.replace(/index.html$/g, '')
```
## Resources
* [VitePress](https://vitepress.dev/)
* [sitemap.js](https://github.com/ekalinin/sitemap.js)
---
---
url: 'https://laros.io/generating-url-friendly-ids-in-supabase.md'
description: >-
Learn how to generate short, URL-friendly IDs in Supabase using a PostgreSQL
function called Nano ID. This step-by-step guide shows you how to create
unique IDs that are easy to read, without revealing any private information.
---
# Generating URL-friendly IDs in Supabase
This post offers a tutorial on how to generate short IDs using a Postgres function, which can be used in any Postgres database, including Supabase. Short IDs are useful because they can make URLs easier to read while keeping information private.
Although [UUIDs](https://supabase.com/docs/guides/database/extensions/uuid-ossp) can also be used for this purpose, they may not be ideal if you plan to display them to users in URLs, as they can be quite lengthy and cumbersome. Instead, it would be better to use a shorter string that is generated randomly and is also cryptographically secure.
This tutorial employs Nano ID, a popular, fast, and compact option.
## Install Nano ID
Execute the file script below in your database in order to create the `nanonid()` function. The source of this script can also be found at the Nano ID for PostgreSQL [GitHub repository](https://github.com/viascom/nanoid-postgres).
```sql
/* Source: https://github.com/viascom/nanoid-postgres/blob/main/nanoid.sql */
CREATE EXTENSION IF NOT EXISTS pgcrypto;
CREATE OR REPLACE FUNCTION nanoid(size int DEFAULT 21, alphabet text DEFAULT '_-0123456789abcdefghijklmnopqrstuvwxyzABCDEFGHIJKLMNOPQRSTUVWXYZ')
RETURNS text
LANGUAGE plpgsql
volatile
AS
$$
DECLARE
idBuilder text := '';
i int := 0;
bytes bytea;
alphabetIndex int;
mask int;
step int;
BEGIN
mask := (2 << cast(floor(log(length(alphabet) - 1) / log(2)) as int)) - 1;
step := cast(ceil(1.6 * mask * size / length(alphabet)) AS int);
while true
loop
bytes := gen_random_bytes(size);
while i < size
loop
alphabetIndex := (get_byte(bytes, i) & mask) + 1;
if alphabetIndex <= length(alphabet) then
idBuilder := idBuilder || substr(alphabet, alphabetIndex, 1);
if length(idBuilder) = size then
return idBuilder;
end if;
end if;
i = i + 1;
end loop;
i := 0;
end loop;
END
$$;
```
## How to use
Imagine we want to create a table named `todos` and give each new record a unique, human-readable ID as primary key that we can later use as unique URL. To accomplish this, we'll generate a unique ID using only lowercase letters, and it will be 20 characters long.
```sql
create table todos (
id char(20) default nanoid(20, 'abcdefghijklmnopqrstuvwxyz') primary key,
title text not null
);
```
Example output:
```txt
oqysjinzebircvklhgqt
aiaosxfkkjawlgtaqowa
phoqybagbdfdubpnylkx
zdhhilehjymwwuwgoapx
hlnsvrcjjloqxfbiljsz
```
We have short, unique IDs that are safe to use in URLs and APIs. These IDs are easy to copy, don't reveal any private information, and they're not ugly.
## Resources
* [Supabase](https://supabase.com/)
* [Nano ID](https://github.com/ai/nanoid)
---
---
url: 'https://laros.io/updating-timestamps-automatically-in-supabase.md'
description: >-
Update timestamps automatically in Supabase whenever a row is created or
updated with the MODDATETIME extension. Perfect for frequent data changes in
your applications.
---
# Updating timestamps automatically in Supabase
Supabase makes it easy to update timestamps automatically whenever a row is created or updated in your database, using the `MODDATETIME` extension. This can especially be useful in applications where data is frequently changed.
## SQL snippet
Replace `YOUR_TABLE_NAME` with the name of your table.
```sql
-- Add new columns to table named `created_at` and `updated_at`
ALTER TABLE YOUR_TABLE_NAME
ADD COLUMN created_at timestamptz default now(),
ADD COLUMN updated_at timestamptz;
-- Enable MODDATETIME extension
create extension if not exists moddatetime schema extensions;
-- This will set the `updated_at` column on every update
create trigger handle_updated_at before update on YOUR_TABLE_NAME
for each row execute procedure moddatetime (updated_at);
```
The property `created_at` will be set when a new row is added to the table, and `updated_at` will be updated on each update.
## Manually enable extension
1. Navigate to `Database` -> `Extensions` in your Supabase dashboard
2. Enable the `MODDATETIME` extension
3. Add a new column to your table named `created_at`, with type `timestamptz`, and default value `now()`
4. Add a new column to your table named `updated_at`, with type `timestamptz`
5. Go to the SQL editor and run the following query (replace `YOUR_TABLE_NAME` with the name of your table):
```sql
create trigger handle_updated_at before update on YOUR_TABLE_NAME
for each row execute procedure moddatetime (updated_at);
```
## Resources
* [Supabase](https://supabase.com/)
---
---
url: 'https://laros.io/seeding-users-in-supabase-with-a-sql-seed-script.md'
description: >-
A practical guide to programmatically seeding test users into Supabase Auth
using SQL and pgcrypto for faster development and automated testing.
---
# Seeding users in Supabase with a SQL script
Since I couldn't find any decent resources online about seeding the database (Supabase) using a seed script, I decided to put together a small guide. When developing locally, having "ready-to-go" users is essential for both team collaboration and end-to-end testing with tools like Playwright or Cypress.
Instead of manually creating users via the dashboard or API, you can use a SQL seed script to automatically populate your authentication schema with demo accounts, giving you the flexibility to reset your database without having to manually add demo users afterward.
## The Seeding Script
The following script uses the `pgcrypto` extension to handle password hashing. It creates a user in `auth.users` and establishes the necessary link in `auth.identities` to ensure the account is functional.
```sql
-- Enable pgcrypto for password hashing
CREATE EXTENSION IF NOT EXISTS "pgcrypto";
-- Generate a random UUID for the user
DO $$
DECLARE
v_user_id UUID := gen_random_uuid();
-- The password is 'password123'
v_encrypted_pw TEXT := crypt('password123', gen_salt('bf'));
BEGIN
-- 1. Insert the user into auth.users
INSERT INTO auth.users (
id,
instance_id,
aud,
role,
email,
encrypted_password,
email_confirmed_at,
raw_app_meta_data,
raw_user_meta_data,
created_at,
updated_at
)
VALUES (
v_user_id,
'00000000-0000-0000-0000-000000000000',
'authenticated',
'authenticated',
'user@example.com',
v_encrypted_pw,
NOW(),
'{"provider":"email","providers":["email"]}',
'{"first_name": "Demo", "last_name": "User"}',
NOW(),
NOW()
);
-- 2. Link an identity so the user can actually log in
INSERT INTO auth.identities (
id,
user_id,
identity_data,
provider,
provider_id,
last_sign_in_at,
created_at,
updated_at
)
VALUES (
v_user_id,
v_user_id,
format('{"sub": "%s", "email": "user@example.com"}', v_user_id)::jsonb,
'email',
v_user_id,
NOW(),
NOW(),
NOW()
);
END $$;
```
## Key Components
### 1. Password Hashing
We use `crypt(v_password, gen_salt('bf'))` to hash the plain-text password using the Blowfish algorithm. This is required because Supabase expects the `encrypted_password` column to be hashed; otherwise, logins will fail.
### 2. User Meta Data
The `raw_user_meta_data` column is populated using JSON. This allows you to attach custom fields like `first_name` or `avatar_url` directly to the user during the seed process, which can then be accessed in your application via `supabase.auth.getUser()`.
### 3. Identities Table
In recent versions of Supabase, a user must have an entry in `auth.identities` to sign in successfully. The script ensures the `provider_id` and `user_id` are linked correctly to the email provider.
## How to use
To run this script, you can either:
1. **Supabase CLI:** Place the code in your `supabase/seed.sql` file.
2. **SQL Editor:** Paste the code directly into the Supabase Dashboard SQL Editor and run it.
## Resources
* [Supabase Auth Documentation](https://supabase.com/docs/guides/auth)
* [Supabase Local Development & CLI](https://supabase.com/docs/guides/local-development)
* [Supabase Seeding Guide](https://supabase.com/docs/guides/local-development/seeding-your-database)
---
---
url: >-
https://laros.io/using-angular-material-calendar-with-date-ranges-and-range-presets.md
description: >-
Learn how to use Angular Material's calendar with date ranges and presets.
Streamline date selection and enhance the user experience. Complete with code
examples and implementation details.
---
# Using Angular Material's calendar with date ranges and range presets
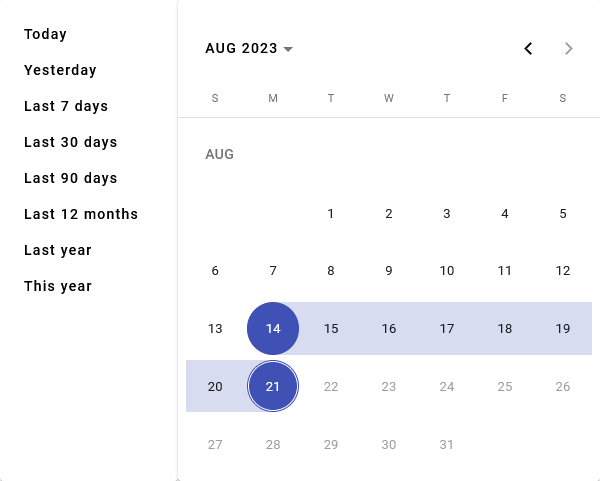
Angular Material's calendar component is a valuable tool for handling date ranges in Angular applications. However, the existing documentation may be limited, and online examples often lack completeness or rely on unconventional methods, that's why we've decided to write this blog post.
While this post won't be a step-by-step tutorial, we'll explain all the relevant parts. Additionally, you can find a complete implementation, including the custom range preset buttons, on [StackBlitz](https://stackblitz.com/edit/angular-material-calendar-with-date-ranges-and-presets).
## Getting Started
We assume you're already familiar with Angular Material and the calendar component but are running into issues while setting it up to handle date ranges and custom date range presets. If you're not, no worries! You can start by checking out the official documentation on Angular Material's [website](https://material.angular.io/components/datepicker/overview#using-mat-calendar-inline).
## Setting Up Providers
To begin, we need to set up the necessary providers for the Angular Material calendar component. These providers enable the preview functionality. Here's an example of how to set up the providers:
```ts
import {
DefaultMatCalendarRangeStrategy,
MatRangeDateSelectionModel,
} from '@angular/material/datepicker';
@Component({
...,
providers: [DefaultMatCalendarRangeStrategy, MatRangeDateSelectionModel],
})
```
## Handling Date Range Selection
Next, let's implement the event handler for when the date range selection changes. This handler will be triggered when a user clicks on a date in the calendar. Here's an example implementation:
```ts
selectedDateRange: DateRange | undefined;
constructor(
private readonly selectionModel: MatRangeDateSelectionModel,
private readonly selectionStrategy: DefaultMatCalendarRangeStrategy,
) { }
// Event handler for when the date range selection changes.
rangeChanged(selectedDate: Date) {
const selection = this.selectionModel.selection,
newSelection = this.selectionStrategy.selectionFinished(
selectedDate,
selection
);
this.selectionModel.updateSelection(newSelection, this);
this.selectedDateRange = new DateRange(
newSelection.start,
newSelection.end
);
}
```
By updating the selection model and assigning the new date range to selectedDateRange, we can ensure that the selected range is accurately reflected in the UI.
Make sure to update your template as well:
```html
```
That's it! By following the steps outlined above, you should now have a fully functional calendar component capable of handling date ranges.
## Creating Custom Date Range Presets
To enhance the user experience, we can implement custom date range presets. These presets allow users to quickly select commonly used date ranges without manually selecting individual dates. Here's an example configuration for presets:
```ts
presets = [
{
label: 'Today',
range: {
start: new Date(),
end: new Date(),
},
},
{
label: 'Last 7 days',
range: {
start: (() => {
const date = new Date();
date.setDate(date.getDate() - 7);
return date;
})(),
end: new Date(),
},
},
{
label: 'Last 30 days',
range: {
start: (() => {
const date = new Date();
date.setDate(date.getDate() - 30);
return date;
})(),
end: new Date(),
},
},
...
]
```
Make sure to render the available presets in your template, allowing users to select them with a single click:
```html
```
To handle the preset selection, include a preset handler like the following example. This handler sets the selected date range and ensures that the calendar navigates to the month where the start date lies:
```ts
selectPreset(presetDateRange: { start: Date; end: Date }) {
this.selectedDateRange = new DateRange(
presetDateRange.start,
presetDateRange.end
);
// Jump into month of presetDateRange.start
if (presetDateRange.start && this.calendar)
this.calendar._goToDateInView(presetDateRange.start, 'month');
}
```
## Try it Yourself
And there you have it! With the steps outlined in this post, you're well-equipped to use Angular Material's calendar component with date ranges and custom presets. Remember, if you want to see a complete implementation, including the custom range preset buttons, check out the [StackBlitz](https://stackblitz.com/edit/angular-material-calendar-with-date-ranges-and-presets) example provided.
---
---
url: 'https://laros.io/how-to-get-the-current-url-with-nextjs-on-vercel.md'
description: Learn how to get the current URL with Next.js on Vercel
---
# How to get the current URL with Next.js on Vercel
Vercel, a popular platform for deploying Next.js applications, provides convenient ways to manage environment variables. One such variable, `NEXT_PUBLIC_VERCEL_URL`, can be particularly useful for obtaining the current URL of your application. In scenarios where dynamic preview URLs are generated on Vercel, obtaining the current URL can be challenging. In this article, we'll explore how to obtain dynamic URLs and leverage the `dotenv-expand` package, in a Next.js project.
## Exposing Environment Variables
Vercel simplifies the process of exposing system environment variables to your deployments. By checking the `Automatically expose System Environment Variables` checkbox in your deployment settings, Vercel automatically exposes variables like `NEXT_PUBLIC_VERCEL_URL` to your application.
## Environment Variable Setup
Managing URLs across different environments is a common requirement in web development. Here's how you can set up environment variables for different environments in your Next.js project.
### Development Environment
In your development environment, you can define the `NEXT_PUBLIC_URL` variable in your `.env.development` file:
```plaintext
NEXT_PUBLIC_URL=http://localhost:3000
```
### Production Environment
For the production environment, you can utilize the `NEXT_PUBLIC_VERCEL_URL` variable provided by Vercel. This can be set in your `.env.production` file or directly in the Environment Variables settings of your Vercel project:
```plaintext
NEXT_PUBLIC_URL=https://$NEXT_PUBLIC_VERCEL_URL
```
## Handling Environment Variables
A common issue with directly using `NEXT_PUBLIC_URL=https://$NEXT_PUBLIC_VERCEL_URL` in your environment varariables file is that it outputs a literal string in your application when using `process.env.NEXT_PUBLIC_URL`, which may not be desirable. To work around this limitation and ensure dynamic variable handling, consider using the `dotenv-expand` package.
### Installation
You can install the `dotenv-expand` package via npm:
```sh
npm install dotenv-expand
```
### Integration with Next.js
After installing `dotenv-expand`, integrate it into your Next.js configuration file:
```javascript
// next.config.js
const dotenvExpand = require("dotenv-expand");
dotenvExpand.expand({ parsed: { ...process.env } });
// The rest of your config
```
By adding `dotenv-expand` into your project, the environment variable value will be dynamically expanded, providing a more flexible approach to handling URLs in your Next.js application.
## How to use
By making this change, you're able to access the current URL of your application in your development environment, preview environments, and production environment, ensuring seamless functionality across all stages of development.
```js
console.log(process.env.NEXT_PUBLIC_URL);
// Output localhost: http://localhost:3000
// Output preview: https://random-url.vercel.app
// Output production: https://your-website.com
```
---
---
url: 'https://laros.io/index.md'
description: >-
Developer with a passion for writing clean and functional code, and bringing
beautiful ideas to life
---